This lens was made for the half-frame Belarussian "Chaika" ("Чайка" = "Seagull") half-frame cameras. The 2nd and 3rd models of the Chaika were designed to have removable lenses. No one is sure why this was done -the first Chaika model had a fixed, non-detachable lens-, but I think it was to allow the lens to be used in an Enlarger for printing.
The lens has the standard Leica M39 thread (LTM39) mount, but the working distance (the focal plane to lens mount flange distance the lens is positioned which allows infinity focus) is not the the same. Leica's is 28,8mm. Chaika used something like 29 or so mm. This extra millimetre or so prevents infinity focusing when the I-69 28mm lens is mounted on the Leica.

the "Индустар-69" 2,8/28mm mounted on a Leica IIIc
As the reader will note later, infinity focus is not the only, nor is it the greatest concern here. Coverage, or the ability to focus an image large enough to fill the frame. "Frame" here is relative- the standard 24 X 36mm, 'half-frame'(a.k.a. "single frame") 18 X 24mm, and the 23.7 x 15.6 mm APS-C size CCD of the Epson whose 1,5X factor makes it 'see' like a 42mm on standard 35.
The lens was modified by altering its focus movement. Portions of the inner barrel were filed away to make the lens move further in to allow infinity focus. The focusing scale on the barrel was also reset to synchronise it with the lens' focus. The aperture mark no longer coincided at the new positions, so a new mark was made by putting a drop of red paint on the aperture adjusting ring.
The lens too, being originally meant for a non-RF coupled camera, will focus only by scale since it has no means of engaging with the RF cams of the camera. Scale focusing with a 28mm isn't that hard- its greater DOF more than compensates for focusing errors. Plus, the I-69 has three "snapshot" focus settings on its barrel: "Portrait", "Group", and Landscape". How is this used? Look through the finder and set the focus against the figure which resembles closest what was seen through the finder:
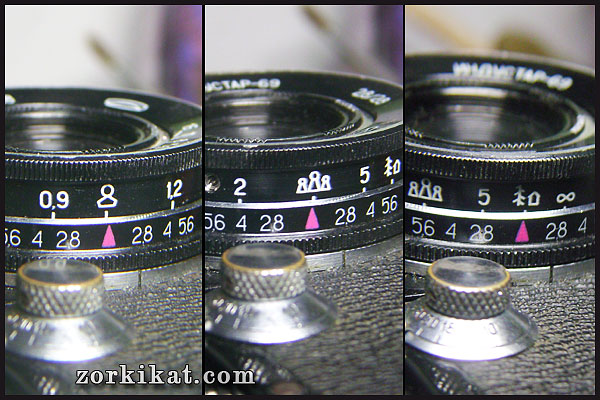
Just line up the figure against the pink triangle which corresponds to "how much" is seen in the viewfinder.
The lens has the standard Leica M39 thread (LTM39) mount, but the working distance (the focal plane to lens mount flange distance the lens is positioned which allows infinity focus) is not the the same. Leica's is 28,8mm. Chaika used something like 29 or so mm. This extra millimetre or so prevents infinity focusing when the I-69 28mm lens is mounted on the Leica.
the "Индустар-69" 2,8/28mm mounted on a Leica IIIc
As the reader will note later, infinity focus is not the only, nor is it the greatest concern here. Coverage, or the ability to focus an image large enough to fill the frame. "Frame" here is relative- the standard 24 X 36mm, 'half-frame'(a.k.a. "single frame") 18 X 24mm, and the 23.7 x 15.6 mm APS-C size CCD of the Epson whose 1,5X factor makes it 'see' like a 42mm on standard 35.
The lens was modified by altering its focus movement. Portions of the inner barrel were filed away to make the lens move further in to allow infinity focus. The focusing scale on the barrel was also reset to synchronise it with the lens' focus. The aperture mark no longer coincided at the new positions, so a new mark was made by putting a drop of red paint on the aperture adjusting ring.
The lens too, being originally meant for a non-RF coupled camera, will focus only by scale since it has no means of engaging with the RF cams of the camera. Scale focusing with a 28mm isn't that hard- its greater DOF more than compensates for focusing errors. Plus, the I-69 has three "snapshot" focus settings on its barrel: "Portrait", "Group", and Landscape". How is this used? Look through the finder and set the focus against the figure which resembles closest what was seen through the finder:
Just line up the figure against the pink triangle which corresponds to "how much" is seen in the viewfinder.
Focusing is often a trivial matter. In many instances, leaving the scale at the "group shot" mark (the 3 metre mark) and using f/8 will deliver DOF with a range of 1,6 metres to infinity.
Since the I-69 was designed to cover the 18X24 frame, the IMAGE CIRCLE it produces will be much smaller- smaller than what 'full frame' needs, but sufficient for the smaller 'half-frame'.
On an APS frame, the corners already vignette. Aside from losing coverage, the edges of the image circle also dims. Here is what it does with the Epson R-D1s digital rangefinder camera:

Scale-focused/distance 'guess-timated' at 0,9 metre. Full 2,8 aperture.
The I-69 is a Tessar type lens, and produces a swirly blur when used at full aperture, for closeups.
The corners of the picture show significant vignetting.
Since the I-69 was designed to cover the 18X24 frame, the IMAGE CIRCLE it produces will be much smaller- smaller than what 'full frame' needs, but sufficient for the smaller 'half-frame'.
On an APS frame, the corners already vignette. Aside from losing coverage, the edges of the image circle also dims. Here is what it does with the Epson R-D1s digital rangefinder camera:
Scale-focused/distance 'guess-timated' at 0,9 metre. Full 2,8 aperture.
The I-69 is a Tessar type lens, and produces a swirly blur when used at full aperture, for closeups.
The corners of the picture show significant vignetting.
If the smaller APS-C frame already shows vignetting, a full 35mm frame shows TOTAL DARKENING at the corners of the frame. This, as well as the significant loss of definition at the threshold areas indicate that its image circle is too small for the 35mm format, but more than sufficient for the half-frame picture.

Same subject as above, but on a 24X36mm Leica frame.
The blue tinge stems from the unfiltered exposure of tungsten movie film in daylight.


Same subject as above, but on a 24X36mm Leica frame.
The blue tinge stems from the unfiltered exposure of tungsten movie film in daylight.
Conclusions: The significant vignetting prevents further use of the lens for 'serious' work on full frame 35. However, it can be useful for experimental or whimsical applications.
On the Epson R-D1s, it can be used as a scale-focus snapshot lens, with a 42mm view. Using it at f/8, the vignetting is not to apparent in many situations.
The lens would be a perfect "normal" focal length for the micro 4/3s cameras. No modification is even necessary to adjust the focus.
On the Epson R-D1s, it can be used as a scale-focus snapshot lens, with a 42mm view. Using it at f/8, the vignetting is not to apparent in many situations.
The lens would be a perfect "normal" focal length for the micro 4/3s cameras. No modification is even necessary to adjust the focus.


